


As a React developer, you may probably know the create-react-app one of the best React build setup with no configuration. Given that, the create-react-app only offers you the project configuration, you still have to find your way to structure your React project. At first, you may create your own structure as long as it satisfies your business requirements, everything seems to work smoothly. But until one day, your project becomes larger, your codebase would get messy and hard to extend. You would try to refactor your project over and over again to make your code easy for developing and maintaining.
If you don't want to lose track of time on refactor your React project, I recommend you to take a look at the React boilerplate which is a highly scalable React skeleton with the best developer experience and focus on performance and best practices.

Why you should use React boilerplate
This is my experience when using this code structure for a few projects
The CLI Interface
You could create components, containers, routes, selectors and sagas and the tests right from the CLI
The Clean Structure
React boilerplate based on the container/component architecture. containers/ contains React components which are connected to the redux store, components/ contains React components which depend on containers for data.
The container usually contains the data and how it loaded or mutated such as the redux reducer, saga, reselect, context ... On the other hand, The component may contain presentational components and usually have some DOM markup and styles of their own
This approach has a lot of benefits
- Better separation, the redux, saga, selector ... are placed on the same container helps you implement the specific behaviors for a container
- Better reusability, you can use the same presentational component with completely different state sources and turn into separate container components
- Better scalability, because the containers are isolated, so you could implement more features with no worries they affect the existing features
Easy for debugging
The Unidirectional data flow allows you to easily trace back the root cause and identify the failures. Moreover, the predictable state management also helps you to keep track of state changes thus you will be able to handle state effectively
Built-in lazy loading
The React boilerplate allows loading components asynchronously with React.lazy and Suspend by creating Loadable file by hand or via component/container generators
The webpack configuration is optimized to automatically bundle all your client-side scripts and chunk them into several files using code splitting where possible. So you don't have to worry about your code when building production
Standard linting
This boilerplate incorporates ESLint, stylelint and Prettier in the code setup. You should install the relevant IDE extensions to use these settings. Whenever you press save, you'll see that your code will be formatted and checked automatically to meet the professional standards.
Besides that, it also has the git hook set up to automatically analyze and fix linting errors before your code is committed
Customizable webpack configs
It's difficult to add custom build configs in the create-react-app. One way to add custom configs is to eject the app, but they still have limited capabilities. On the other hand, React boilerplate provides customizable webpack configs for both development and production environment.
There are more features that the boilerplate also offers such as SEO, i18n internationalization support, Unit testing ... But I will not cover all in this topic.
The core tech
The boilerplate includes tools to help you manage performance, asynchrony, styling, everything you need to build a real application. Before you put your hands on this thing, I'd recommend you to go through the checklist to make sure whether or not you're ready to use this boilerplate.
- React Router
- Redux
- Connected react router
- Redux Saga
- Reselect
- Immer
- Styled component
- Jest
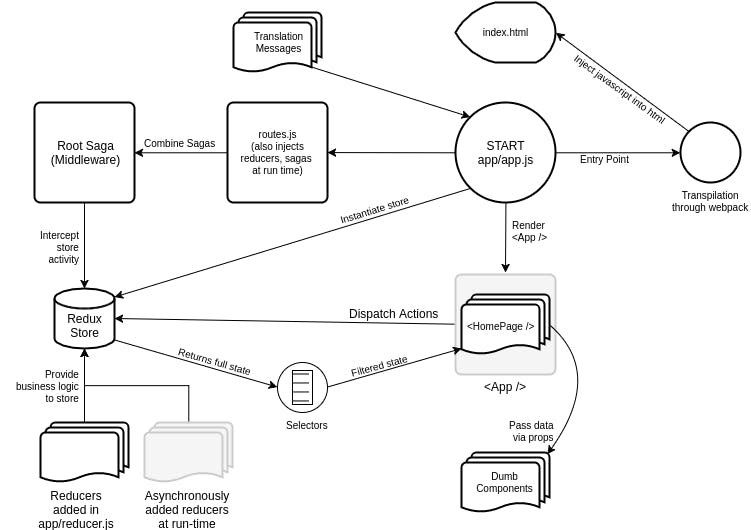
This is the workflow of React boilerplate, you should start up from the app.js
Project structure
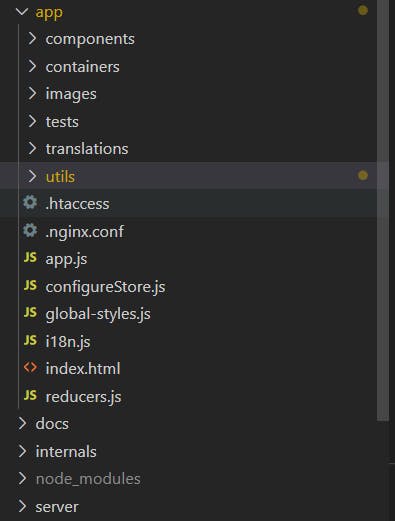
app/
You will write your app in the app folder. This is where all of your React code located including following folders:
components/contains all of your common componentscontainers/contains all of your containersimages/store imagestests/contains the test scriptstranslations/contains your translation files if you want to support multiple languages on your projectutilscontains the utility functions used throughout your project
internals/
contains webpack configs, generators and templates
server/
this folder contains development and production server configuration
Quick start
Time to get your hand dirty. First, follow these instructions to install the React boilerplate:
Initialize project
- Make sure that you have Node.js v8.15.1 and npm v5 or above installed.
- Clone this repo using
git clone --depth=1 https://github.com/react-boilerplate/react-boilerplate.git <YOUR_PROJECT_NAME> - Move to the appropriate directory:
cd <YOUR_PROJECT_NAME>. - Run
npm run setupin order to install dependencies and clean the git repo.
At this point you can runnpm startto see the example app athttp://localhost:3000. - Delete all files and folders in the
components/folder - Delete all files and folders in the
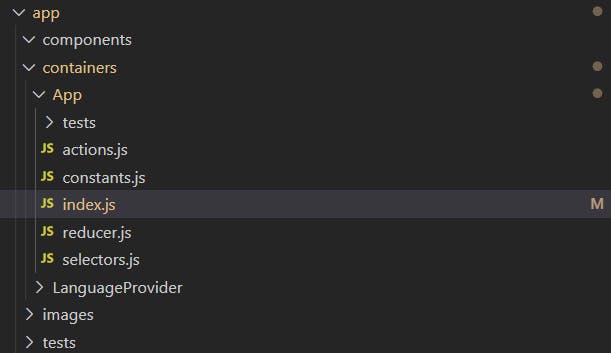
containers/folder except theAppandLanguageProvidercontainers
Now, Let's create our first container named HomePage using the CLI, run the command
npm run generate
Select container and set name to HomePage and press y for all questions

The React boilerplate will generate the HomePage container with following files:
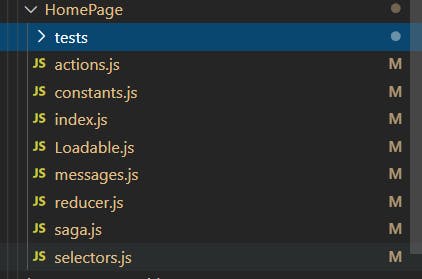
actions.js: this file contains all redux actions of this containerconstants.js: this file contains all redux action type constantsindex.js: the main fileLoadable.js: Asynchronously loads the componentreducer.js: contains the reducer handler integrated with dimmer for immutable state controlsaga.js: redux-saga middleware for side effect managementselectors.js: better performance optimized by using memoizationmessages.js: i18n support for multiple languagestests/: this folder contains Jest testing scripts
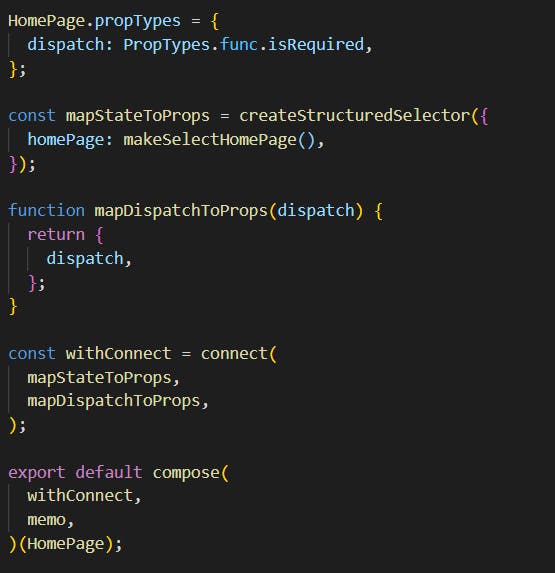
You can see that the boilerplate already generated the mapStateToProps and map DispatchToProps for you. So you don't need to manually connect the container to the root reducer because the boilerplate will do it for you.
Create a simple cat form
Now, Let's create a form in the boilerplate. We're going to make a simple form in the HomePage container we just created, to fetch user data from JSON placehoder. Then, We will match each entry in the user data with a cat from Robohash.
First, create a urls.js file in the app/ folder to store the API URL
export const CATS = 'https://jsonplaceholder.typicode.com/users';
export const getAvatarUrl = id =>
  `https://robohash.org/${id}?set=set4&size=180x180`;
Inside the HomePage container, we create some constants for actions
export const GET_CATS = 'app/HomePage/GET_CATS';
export const GET_CATS_SUCCESS = 'app/HomePage/GET_CATS_SUCCESS';
export const GET_CATS_FAILED = 'app/HomePage/GET_CATS_FAILED';
Next, we create actions for getting cats
import * as constants from './constants';

export function getCats(payload = {}) {
  return {
    type: constants.GET_CATS,
    payload,
  };
}

export function getCatsSuccess(payload) {
  return {
    type: constants.GET_CATS_SUCCESS,
    payload,
  };
}

export function getCatsFailed(payload) {
  return {
    type: constants.GET_CATS_FAILED,
    payload,
  };
}
Then, create saga to handle calling API side-effects
import { takeLatest, call, put } from 'redux-saga/effects';
import request from 'utils/request';

import * as actions from './actions';
import * as constants from './constants';
import { CATS } from 'urls';

function* onGetCats() {
  try {
    const res = yield call(request, CATS, {});
    yield put(actions.getCatsSuccess(res));
  } catch (err) {
    yield put(actions.getCatsFailed(err));
  }
}

export default function* homePageSaga() {
  yield takeLatest(constants.GET_CATS, onGetCats);
}
Implement the reducer to manage state changing
import produce from 'immer';
import * as constants from './constants';

export const initialState = {
  data: [],
  errors: {},
  isLoading: false,
};

const homePageReducer = (state = initialState, action) =>
  produce(state, newState => {
    switch (action.type) {
      case constants.GET_CATS:
        newState.errors = {};
        newState.isLoading = true;
        break;
      case constants.GET_CATS_SUCCESS:
        newState.isLoading = false;
        newState.data = action.payload;
        break;
      case constants.GET_CATS_FAILED:
        newState.isLoading = false;
        newState.errors = action.payload;
    }
  });

export default homePageReducer;
We then need to set up the selectors to get the memorized state from the reducer
import { createSelector } from 'reselect';
import { initialState } from './reducer';

const selectHomePageDomain = state => state.homePage || initialState;

const makeSelectHomePage = () =>
  createSelector(
    selectHomePageDomain,
    substate => substate,
  );

export const makeSelectData = () =>
  createSelector(
    selectHomePageDomain,
    substate => substate.data,
  );

export default makeSelectHomePage;
export { selectHomePageDomain };
Up to now, everything is ready we just need to create a Form to show the data. Let's create a CatForm inside the HomePage container because the CatForm may be
only specified for the HomePage container

index.js
import React, { memo } from 'react';
import PropTypes from 'prop-types';
import { connect } from 'react-redux';
import { compose } from 'redux';
import { createStructuredSelector } from 'reselect';

import { makeSelectData } from '../../selectors';
import * as actions from '../../actions';
import Button from 'components/Button';
import CardList from 'components/CardList';

function CatForm({ data, dispatch }) {
  const [cats, setCats] = React.useState(null);

  React.useEffect(() => {
    setCats(data);
  }, [data]);

  return (
    <>
      <Button
        onClick={() => {
          dispatch(actions.getCats());
        }}
      >
        Get Cats
      </Button>
      {cats ? <CardList cats={cats} /> : null}
    </>
  );
}

CatForm.propTypes = {
  dispatch: PropTypes.func.isRequired,
};

const mapStateToProps = createStructuredSelector({
  data: makeSelectData(),
});

function mapDispatchToProps(dispatch) {
  return {
    dispatch,
  };
}

const withConnect = connect(
  mapStateToProps,
  mapDispatchToProps,
);

export default compose(
  withConnect,
  memo,
)(CatForm);
We can create a Loadable file to handle lazy loading for this form
import loadable from 'utils/loadable';

export default loadable(() => import('./index'));
Afterward, we attach this Form as a component to the HomePage container
import React from 'react';
import { Helmet } from 'react-helmet';
import { FormattedMessage } from 'react-intl';

import { useInjectSaga } from 'utils/injectSaga';
import { useInjectReducer } from 'utils/injectReducer';

import reducer from './reducer';
import saga from './saga';
import messages from './messages';

const CatForm = React.lazy(() =>
  import('containers/HomePage/screens/CatForm/Loadable'),
);

export default function HomePage() {
  useInjectReducer({ key: 'homePage', reducer });
  useInjectSaga({ key: 'homePage', saga });

  return (
    <div>
      <Helmet>
        <title>HomePage</title>
        <meta name="description" content="Description of HomePage" />
      </Helmet>
      <FormattedMessage {...messages.header} />
      <CatForm />
    </div>
  );
}
Finally, we should create Route to the HomePage container in the App container
import React from 'react';
import { Helmet } from 'react-helmet';
import styled from 'styled-components';
import { Switch, Route } from 'react-router-dom';

import HomePage from 'containers/HomePage/Loadable';

import GlobalStyle from '../../global-styles';

const AppWrapper = styled.div`
  margin: 0 auto;
  display: flex;
  min-height: 100%;
  padding: 0 16px;
  flex-direction: column;
`;

export default function App() {
  return (
    <AppWrapper>
      <Helmet
        titleTemplate="%s - React.js Boilerplate"
        defaultTitle="React.js Boilerplate"
      >
        <meta name="description" content="A React.js Boilerplate application" />
      </Helmet>
      <Switch>
        <Route exact path="/" component={HomePage} />
      </Switch>
      <GlobalStyle />
    </AppWrapper>
  );
}
And Done! Here is the Demo app

Conclusion
The boilerplate may be confusing at first, but I think it's well-structured and easy to apply for extending and maintaining your React project. I very appreciate and thank you for reading until this far. for further information, you can take a look at the Demo application Here and the React boilerplate project Here.